Thursday, August 12, 2021

Taking a Beading Break

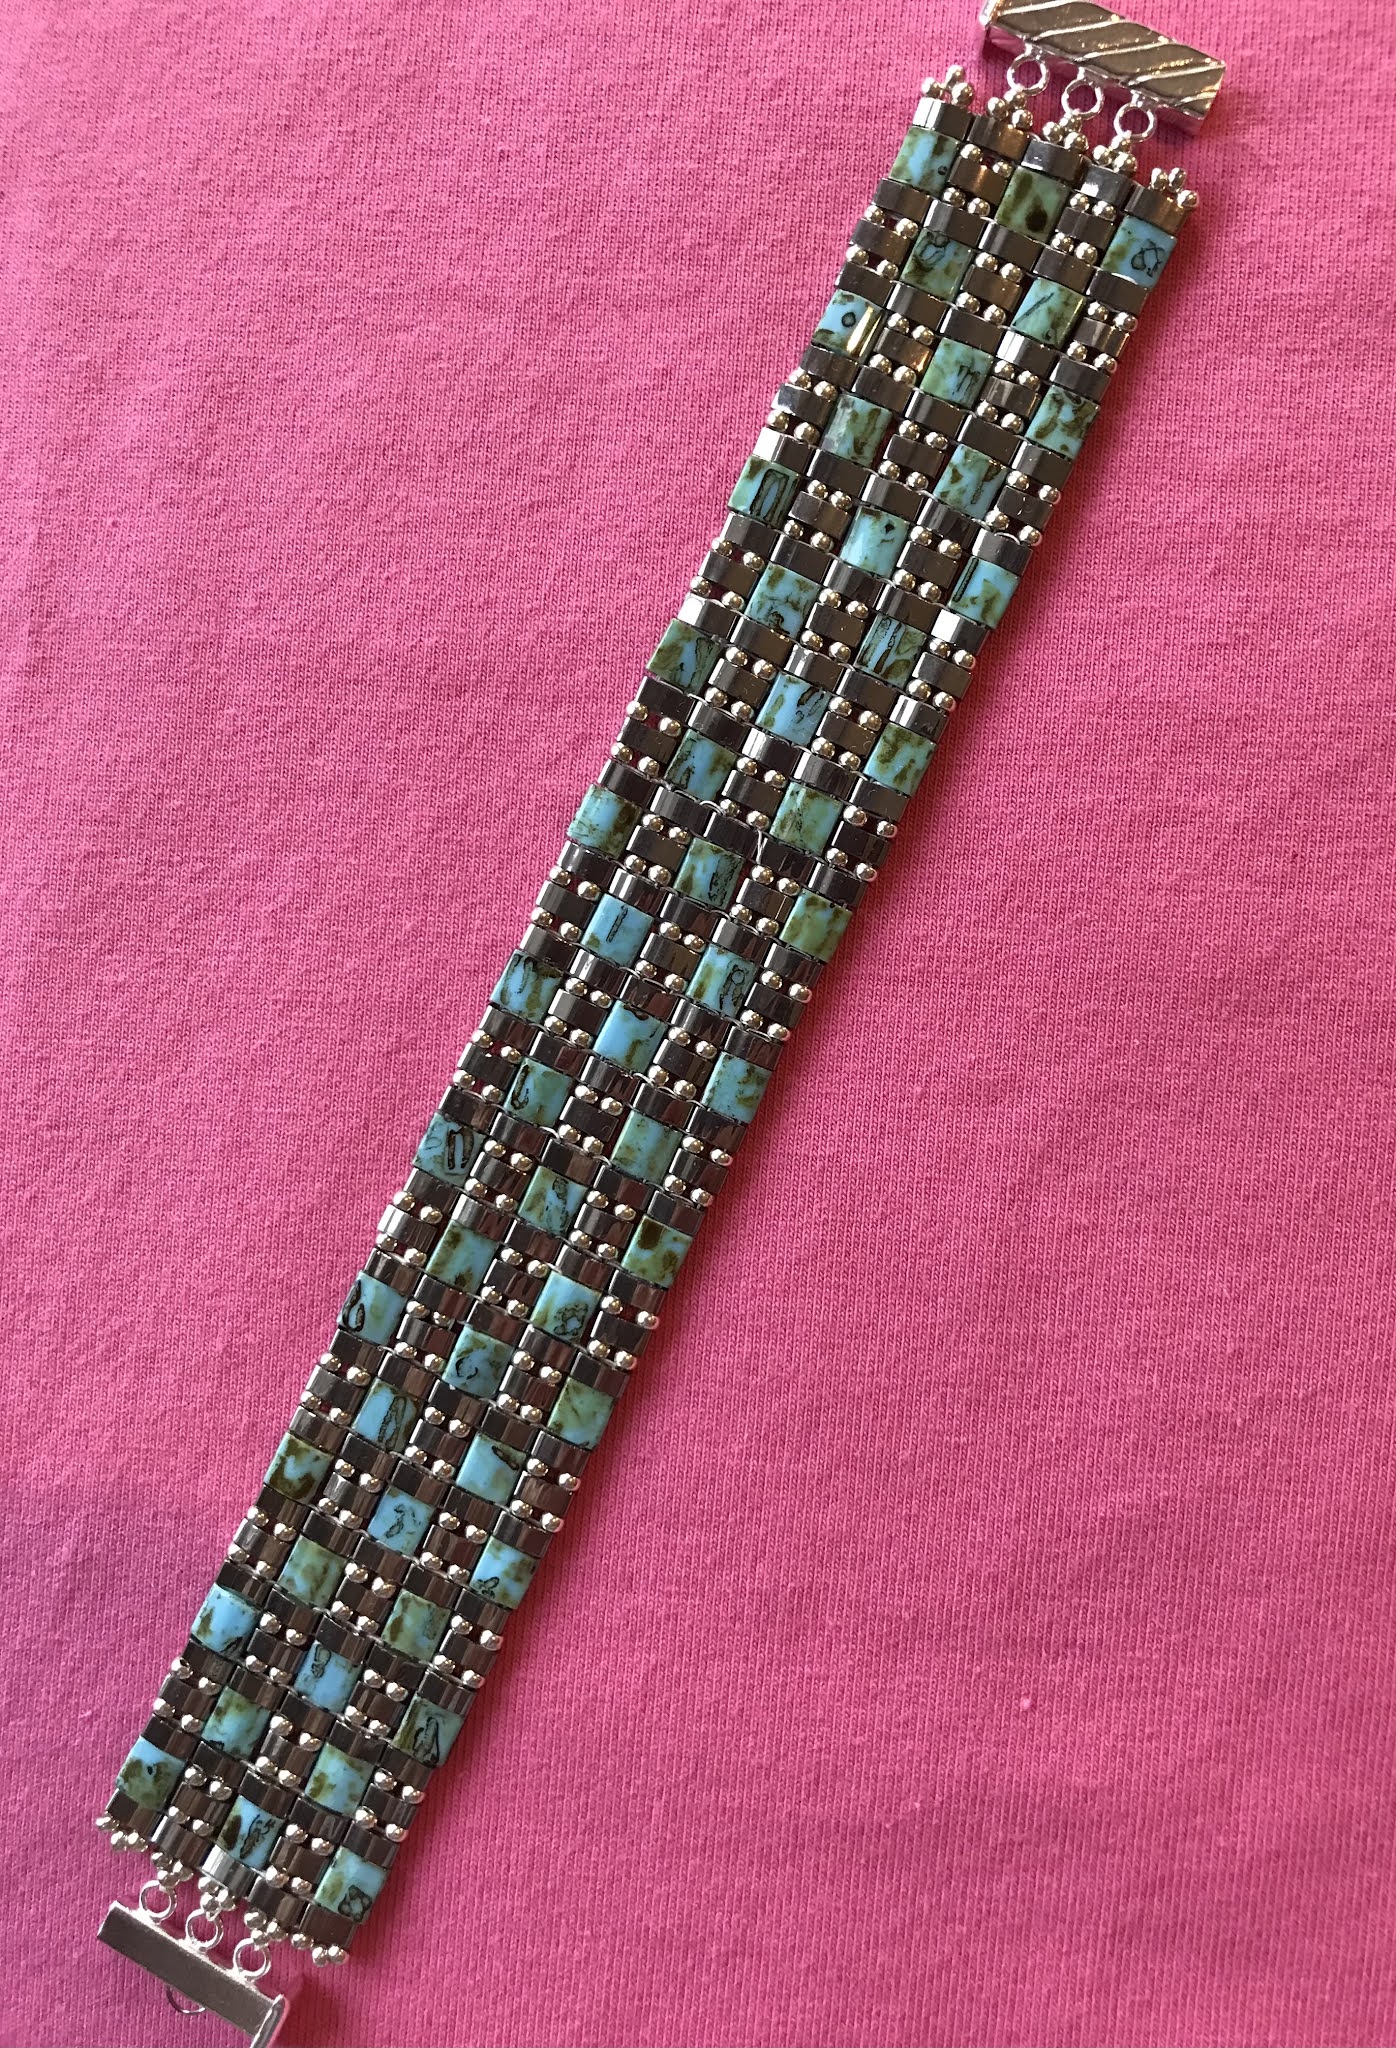
 After sewing up a bunch of tees and a pair of wide-legged pants (Style Arc Fifi), it seemed time to take a break from clothing and try a beading project.

Most of the things I do with beads are off-loom weaving using Peyote stitch and brick stitch and most of the projects are earrings. Two reasons really -- I wear earrings daily, and an earring project is small and manageable. I have several bracelet bodies laying around, but somehow have never gotten around to actually finishing them up with fasteners. OK, the sensible thing to do would be to finish up one of those, but nope -- I felt the need to start something new.

I decided on a design by Deb Roberti -- Parquet Band. It's a modified square stitch pattern using Tila beads by Miyuki. Her instructions are very clear and very beginner friendly. Although I've been playing with beads for a while, I don't do it often enough to have everything be second nature and I really appreciate thorough instructions.

So, my version of Parquet Band:


Monday, July 19, 2021

Fun with a collar frill

My phone has decided to be uncooperative with photos, but let's try this anyway.

Another stash fabric goes under the rotary cutter -- this one a lightweight seersucker. It was originally white with a brown stripe. After a dip in the dyepot (Rit indigo) it is now a color much more flattering to my silver grey locks.

I used my shoulder princess seam shirt block and decided to give it a little lift with a ruffle on the collar stand. I wanted to try something a tiny bit different though, and have the center back of the ruffle be higher than the front edges. Sort of a 'popped' collar look? 


So, I took a collar ruffle from a pattern I had and redrafted it to be 1 inch higher at the back, which I thought would be a small, but noticeable, change.
I thought the seersucker was light enough to allow me to have a doubled ruffle (i.e. no hemmed edges showing) but that may have been a slight miscalculation. Although the fabric itself is light, the texture of the weave gives it more bulk, so a single layer might have been a better choice. Live and learn.

More learning -- the pattern I borrowed the ruffle from had the ruffle continue around the curved edge of the collar stand. I found that a bit tricky to neatly distribute the gathers around the edge, and even after redoing it's not my best work. It's a cotton, everyday shirt though so I'll live with it. (shrug) When I do this again though I will either square off the top edge of the collar stand, or see how it looks with the ruffle started after the curve.


And yet more learning -- the higher the back is made the more it will tend to droop without reinforcement. This is one case when a stiffer fabric is needed. I'm fine with it, but I do wonder how interfacing it might have helped.

The sleeves were hemmed at 3/4 length, which is my preferred summer length. I didn't like the width of the lower edge though --I should have tapered them in a bit. Well, might as well try an after-the-fact taper, so I made four small darts around the sleeve opening. If I had made them a bit larger I think I would have gotten a nice lantern effect, but I was worried about making the opening too small, so...


All in all, it worked out to be a wearable everyday shirt. I learned a few things, and I got another small fabric cut out of the stash and into my closet. I'm calling it a win.


Tuesday, June 15, 2021

Time For a Trim

 Looking for a quick and easy project between sewing tops and putting off sewing together a machine knit cardigan, I decided to do a slight update to my Panama straw hat. It was fine the way it was, but I was in the mood for a small change.

I started out with this: 

The only change made to the purchased hat was an added beaded butterfly. The band around the hat was a simple leather strip. It was purchased from Goorin Bros. I've gotten a few hats from there; I like the fact that most of them are available in multiple sizes. 


I thought it might be nice to have a wider band, so I bought some lovely silk ribbon from Etsy seller SewVintagely. I went with 1" wide black ribbon, and because I wanted to do some manipulation I got three yards -- which turned out to be a fairly accurate guesstimate.

I used a technique I had done before on a sewing project which is known as a double shell ruffle. It's quite simple to do, and I think it gives a nice effect.

As long as I was doing this, I decided to change out the beaded butterfly for a different one. And here's what I ended up with:  


For anyone interested in how to do: a basting stitch (I do by hand but it could be done by machine) is run down the length of your trim in zigzag fashion, like this:


I marked the top edge of the ribbon with a chalk dot at 2" intervals. On the bottom edge I made the same mark at 2" intervals, but offset them by one inch so that they fell exactly between the top marks. You can use whatever measurement that suits your material -- the important thing is to have your basting at crisp right angles. 

Baste away, pulling the stitches every few inches so that you are gathering as you go. For the hat band I pulled them up fairly tightly. As I was sewing the ends together for a circular band I left them straight edged -- for using as a trim on a garment it would look nicer to miter the ends into a point when you've completed the gathering. 

As noted above, I had purchased 3 yards of ribbon and I ended up with 20" left over, so as you can see it does eat up a lot of ribbon/fabric. For reference, the length of finished trim needed (plus seam allowance to sew together was approximately 24".

I have used fabric for this too -- for trim on a voile cardigan I used a tube of the voile about 1.5" wide and basted exactly the same. I wouldn't try this on anything too heavy or stiff, but it worked beautifully on the silk ribbon and the voile.


Wednesday, June 9, 2021

June - already?

Well, May whizzed by without me documenting any projects.  Good thing I do this so I have a record of what I've done and not for any audience!

I got to the point where I felt I had enough basics sewn to get me through warmer weather, so then I decided to play a bit. 

When we lived in Houston, many moons ago, everyone had at least one "Mexican" dress. (Local terminology - I believe they are more properly known as Oaxacan dresses) They were (and probably still are) sold from vans along major routes in a virtual rainbow of colors, sizes and designs. Not especially finely crafted, they were a fun casual "just throw it on" look and a great pool coverup. My own were worn out (and truthfully, outgrown) long ago. So I decided to try my hand at one.

I used a pattern diagram from redpajamamama.wordpress.com (May 14, 2008 entry). I intended to make a full length dress, but messed up with the fabric requirement, so it became a top. (sad face) I decided to use a beefier cotton than what I remembered from the van dresses, and ordered some Kona cotton yardage. That was really nice as a background fabric for embroidery, but actually a less heavy fabric would have been better for wearing drape. Live and learn. I bought an embroidery pattern from Folkwear for the bodice and used it (sort of) for what I expected to be the front bodice. Oops, no - I placed it much lower than I wanted it so...that became the back bodice. I hadn't cut out the head hole, so that wasn't a problem. Then I decided I really didn't want that on the front even properly placed. I ended up taking some elements of the Folkwear embroidery pattern and adding some other random flowers and a couple of butterflies from a stencil I had. Somehow it came together and I ended up with -- 


Definitely not a work of art, but cheerful enough for a breezy summer top. I used regular 6-strand floss divided in half for the embroidered elements, and pearl cotton (size 5) for around the neckline, sleeves and lower bodice.

I wasn't really happy with the way the sleeves stuck out at a 90 degree angle, so took a small dart at the sleeve edge going to nothing at the top of the sleeve. It seemed to pull the angle of the sleeves down just enough to be tolerable and simply looks like a seam.  I'm thinking in a lighter weight cotton this might not have been an issue.

As for the back, with it's too low design --


My embroidery skills are embarrassingly primitive, but I'm OK with that for this type of garment. Basically it's satin stitch, outline stitch and chain stitch. I tried a feather stitch, but ummm, no. My appreciation for the artisans who do this on the regular is immense. 

As much as I'd like to have a full length dress for the summer I think this particular itch has been scratched. The amount of time that it would take for an inexperienced stitcher (i.e. me) to do this by hand for a full dress would be enormous. So, while I'm glad I tried it will be back to my regular sewing for my next projects. It would be fun to try small hand embroidered touches though -- a shirt pocket perhaps?

Friday, April 9, 2021

Spring (ish)

Despite some unsettled weather hereabouts it seems that Spring may finally be here to stay. It's a real mood brightener after a long pandemic slog, and time to make a few new things. Like a lot of folks, pandemic pounds have been added, but luckily most of the old wardrobe still (mostly) fits -- let's have a rousing cheer for knits! At any rate, it's always nice to have a few new bits to liven up what's already there, and here are a few of mine.

The Fitzroy blouse from Liesl + Co. Fabric is a slubbed cotton from Fabric Mart. I was drawn to this pattern by the neckline and the sleeve pleats which give a slight ruffled cuff appearance. It won't be worn when summer heat hits us, but for right now - and when Autumn approaches - it fits the bill. I shortened the body by about 1.5 inches and took the shoulder seam in about 1/4 inch. I generally wear shirts untucked, and even with shortening this one is very near tunic length on me and I am 5'7". In retrospect I could have gone down a size, but I have reached the age where I appreciate comfort over being stylish -- so be it.

Here's a closer look at the sleeve - the tucks don't go all the way around the bottom of the sleeve, but are on the outer edge. 


I had some cotton/Lycra jersey - also from Fabric Mart - in a color I felt was a good addition to the wardrobe so I sewed up a quick tee. Pattern is my TNT knit top, Pamela's Patterns Perfect Tee. To change things up a bit I added a gathered portion to the bottom of the elbow-length sleeve. I think I may be re-doing the bottom of the shirt by adding a non-gathered band instead of having it curved and hemmed. The fabric is just too light to stay nicely in place and wants to flip up - which is something I just can't stand. 


Last summer I made the Lacey dress from Style Arc and it was such a nice addition to the closet that I decided to make another. I used a cotton sateen print, alleged to be navy, but showing definite purple tendencies. This was also a Fabric Mart purchase (I'm guessing I hit a sale for cotton fabrics?). It was a quick and easy make the second time around, and will earn it's keep when the weather gets really warm.


Like the previous Lacey, I lengthened the bodice. It still hits above the waist, but not as near the bust. My only deviation from the pattern was not to cuff the sleeves.


And finally, a garment that can do double duty as a dress or a duster. It's Simplicity 8992 made in a not too heavy striped double knit. I'm guessing this was from Fabric Mart also and is a rayon blend. Made view 3 with 3/4 length sleeves. Instead of buttons (um, really didn't want to make them in a knit fabric) I used snaps. Easy peasy. If worn as a dress it needs a tank underneath for my peace of mind. I envision mostly wearing it as an unbelted duster though. Still, it's nice to have choices!


I do have a few things I hope to make up that are in more "traditional" Spring colors, but these days I sew to please myself alone and in colors that suit me if not the season. And why do otherwise? 😀

Wednesday, March 24, 2021

Instagram vs. Reality

We've all seen those beautifully arranged and decorated craft spaces on Instagram or Pinterest or blogs, and we've all probably sighed as we looked around our own (probably) messy space with mismatched furniture and (probably) thought "someday".

My own situation is that of a down-sizing multi-crafter who once took over a bedroom, a second floor landing and a garage apartment for all her "stuff". It was heaven -- not particularly 'gram worthy as far as decor, but soooo much space! And then we moved. It was a very good move in terms of our older adult lifestyle, but now I have one room to do the work of three+. It's a nice sized room, and I know I am very fortunate to have a space totally dedicated to crafting, but at times I feel like if one more thing comes into this room it will simply explode. So here's a little look at a space that (sort of) works for me for sewing, machine knitting, yarn storage, fabric storage and beading.

Here's a view of the room from the doorway:  


 It's approximately 12 feet wide by 20 feet long. It was designed by the previous owner as an office, with cupboards, shelves and a desk all designed for paperwork and not craft work, so it isn't very ergonomic for sewing.

If all I used the room for was sewing it would be a fairly comfortable work space in terms of square footage. It would still be awkward in terms of desk and counter height though. 


I have several machines for sewing set up permanently -- two sewing machines, a serger and a coverstitch machine. Also a cutting table (on the left of the photo) is kept with both drop leaves open and ready to go.  

In addition to sewing, there are three machines for knitting in the room -- a circular sock knitting machine, a plastic bed mid-gauge LK-150 and a standard gauge SK 280. 


Along the back wall the counter holds my Janome coverstitch and a BabyLock serger. As you can see, there is an open space (for my legs) under the serger, but not the coverstitch -- awkward! Cupboard space is used for (some) fabric and various bits and bobs. The two file drawers hold most frequently used patterns. 


The two sewing machines sit at right angles to one another -- the larger one sits on the desk, and the smaller one sits on the side counter. Thankfully there is space for one's legs under each machine. 


Shelves above the smaller machine hold serger thread cones, plastic containers of buttons and other closures, and various boxes of craft materials (felt, paint, etc)

The desk is kept (relatively) clear, with the exception of a vintage thread box and whatever I happen to be working on.

A small fabric box next to the machine holds various small tools -- thread clips, seam ripper, seam gauge, etc. 


The cutting table takes up a good portion of the room -- it's about 3 feet x 6 feet when fully open, and as I mentioned it is kept open.  It is worth the space it takes up though -- there is no way I could manage cutting anywhere else. My days of cutting out on the floor are long gone!  A wooden yarn swift is usually attached to one corner, although it is removeable.


Also visible to the right of the pic are boxes of patterns stacked on the floor. Not ideal, but I manage not to trip over them (much).

Barely visible to the left of the pattern boxes is a small, shallow drawered cabinet. This holds a lot of my beading and jewelry making supplies.


The other side of the cutting table:


You can see a stool tucked under the edge of the table. That's where I'm sitting now typing this up, and my laptop is kept underneath the table when not in use. (yes, it sits on the floor). Those white rolls of paper are copy shop PDF patterns. My usual MO is to trace the patterns I want to sew and keep the printed patterns intact. To the left of the pattern rolls is a full length mirror. 


There's a small bookcase between the desk and the Ikea table (adjustable height) which holds two knitting machines. I keep knitting patterns and fitting books there, plus some of my coned yarn.


And, might as well show the Ikea table with the knitting machines:


I keep a lightweight wicker chair in the space between the desk and the Ikea table, which can easily be moved to the other side of the knitting table when needed there.  When it's on the other side of the table it also serves for my chair when using the sock machine. 


The sock machine is mounted on a small worktable -- on the floor underneath are two cones of waste yarn and the small red circular object is a rather heavy weight.


So, there we have it -- a craft room crammed to the rafters. It will elicit no feelings of desire among anyone who sees it -- although it does get comments from workmen who happen to look in when doing their plumbing or electrical business in nearby areas. Mostly on the order of "Whoa, your wife sure packs a lot in there, what is all that stuff?".

So don't despair if your space isn't Instagram worthy either. I'm willing to bet that there are probably more rooms like this than the drool worthy ones! But whatever space you have, may it bring you satisfaction as you fashion your creations. 😀

Wednesday, March 17, 2021

Topping Up

 Time to assess my sewing this past (almost) winter season. Most of the garments made were tops, simply because that was what I considered most useful in our current pandemic situation. I had planned to work on a fitting block for slacks, but put that aside because I found I didn't need any additional winter slacks. So, tops.

I made two versions of the Toasters  Sweater: version 1 was sewn from a microfleece from fabric.com that is light weight and drapey - although firm enough to hold the collar shape. 


The color worked well for me, and this was in constant wardrobe rotation. 


The second version was made from a much heavier fabric - a Liberty sweatshirting that I found at The Fabric Store Online. Not sure if the sweatshirting is still available, but they carry a wide range of lovely Liberty fabrics. It's also where I shop for merino jersey which makes an appearance later.


I made this later in the season, so it has had limited wear, but it's great on those days that you need an extra bit of cozy!  It's been my experience that the Liberty sweatshirt fabric holds up nicely in terms of color retention and lack of pilling, so I expect it will still be looking good next cold season.


When I saw some double-faced all wool sweater yardage at Fabric Mart (no longer available) I was smitten even though I really didn't need another grey sweater. When I saw it go on sale - well, need I say more?

This was sewn up in a hooded cardigan from StyleArc. I used the reverse side of the fabric for the cuffs and front band. I thought about doing the lower band in contrast also, but decided I didn't need extra attention to the hips. The pockets were also done in the darker color. I figured the inside of the hood would show contrast so that would be enough to look intentional.


It warmed up right after I sewed this, so it hasn't been worn yet. It will see lots of wear in the future though.


I needed some new turtleneck tops, so I made a few from the merino jersey I mentioned previously. This fabric is the absolute perfect base layer for someone (like me) who is constantly cold in winter months. It isn't inexpensive, and it isn't always easy to find in the US (which is why I order from NZ) but this is one of my all-time favorite fabrics. 

So, 3 tops, all made from Burda 6990, which is my TNT pattern for raglan sleeved tee tops.

Colors are vintage cerise, graphite and black and all have been worn constantly. I launder them by soaking in a wool wash and spinning in my washer, then hanging to dry (on a sloped shoulder hanger). Don't look so shocked - they are practically dry after their spin and are light enough not to stretch out when hung - of course your mileage may vary. When dry I do store them folded.


And lastly, I made up a sweatshirt type top from an OOP Burda (pattern 8569). I used a wool/poly blend, which I'm guessing is more poly than wool by how hard it was to press. I love Fabric Mart, but I do wish they would label fiber proportions on the blends they sell. At any rate, I top stitched the garment into submission and it has seen a bit of wear this past season. So, not a favorite that i reach for constantly, but a nice serviceable layer nonetheless.


And that was how my winter sewing went. I'm happy with all of it, even the less liked Burda 8569, so I'm going to call it a successful season.


And now, bring on the warmer weather!