Monday, December 23, 2019

Teesdale scarf

Another little crochet project -- this one made in Sundara Yarn Sport Merino that's been marinating in the stash for a good bit.

The pattern is by Rebecca Velasquez and was a quick and easy project.  Once I had the pattern memorized it went quickly and could be done while conversing or watching TV. Just the thing to take the sting out of my previously mentioned failed knitting project.

It's scarf sized, rather than a full on shawl, which was just what I needed for the two skeins of Sport Merino (100 g, 225 yards each) that I had.  I think the yarn I used was just a bit heavier than called for in the pattern, and I went up in hook size to account for that.  I ended with a few yards to spare, so that was a relief.

Here's another closeup look: 


Lovely yarn in a scrumptious color (Reaching Out) and a fun to make pattern -- just what the fiber doctor ordered!


Wednesday, December 18, 2019

A Little Crochet

I needed a quick and easy project after hitting a major roadblock in my knitting, so I dug out a skein of luscious baby alpaca and silk (Lorna's Laces Honor) and whipped out the Iced Ascot by Rebecca Velasquez from the book Simply Crochet by Robyn Chachula. I liked Rebecca's pattern enough to do a pattern search of her other designs on Ravelry, and ended up purchasing her Teesdale small shawl/scarf pattern which I'm working on now.


The colorway is Loopy Ewe Shuffle, which leads me to believe it was a one off from The Loopy Ewe, no longer available I'm sure, as it's been in the stash for quite a while.

It was a nice palate cleanser after the heartbreak of running out of yarn for a sweater from a kit, purchased a while back, from a merchant that is no longer in business, and a yarn made specifically for that designer...well, you get the idea. I've been working on it for at least a year, and I was gutted to be unable to finish it off. Sigh.

There has been knitting though -- of the machine variety -- several hats for donation which were knitted on the LK-150. No photos, as they're pretty Plain Jane, but I did have a "D'oh" moment when mattress stitching them up.

I was having trouble seeing where to place my sewing needle to continue a straight seam after pulling the working yarn taut to snug up the stitches.  So I had the bright idea (or so I thought) to put a little marker in the place where I needed to place the needle after snugging up -- like so:  


Worked a charm, but the clever among you will grasp the "D'oh" reaction -- I could have simply placed my needle there before pulling the working yarn taut and been ready for my next stitch in the proper position. Oh well, I felt smart for a moment, anyway!


Wednesday, December 11, 2019

Beading progress

Taking a little break from fabric and fiber to play with beads. I'm waiting for findings to arrive in order to finish them up, but progress so far is pleasing to me.

Both patterns are from Deb Roberti's Around the Beading Table and both are free patterns -- Petite Paisley earrings and Astral bracelet. There are many attractive patterns on her site, both free and to purchase. I have made several of the free patterns, and purchased a couple of others, and what stands out to me about Deb's patterns is the clarity of her instructions. The written instructions are clear and concise, and her diagrams help even a beginner beader like me achieve good results.

I used Zoli Duo (both right and left facing) in Pastel Purple for the earrings and the seed beads are silver-lined crystal. Ran out of jump rings in the size/finish I wanted to use to attach them to ear wires, but it should be a quick finish once they are in hand. 


The bracelet is made with CzechMates 2-hole 7mm beads in Metallic Aurora Red, with 11/0 seed beads (Miyuki Silver Lined Grey) and 3mm fire polished crystal beads.


I was trying for a look of antique silver with the grey seed beads, and I think it comes fairly close. This one is waiting on a clasp. 


Monday, December 2, 2019

Warm gravy

Here's a quick tip I wish I'd known many holiday meals ago.  Instead of that attractive gravy boat that let's your sauces go cold and congealed halfway through your meal -- try using an insulated coffee carafe.


I like this one (NOT an affilliate link) but there are plenty out there that would serve just as well I'm sure. Just pre-heat with boiling water about an hour before you want to use it, then sit back at the dinner table and let everyone enjoy piping hot gravy without you having to jump up and re-heat during the meal.  I've been told by the clean-up crew (DH) that ours was still steaming when leftovers were being packed up. 


Thursday, November 21, 2019

Straighten Up!


Keeping the edges straight on a piece crocheted in dc (double crochet - US terminology) can be a challenge, especially if (like me) you learned to chain 3, count that as a stitch, skip the next chain and proceed down the row. From the first photo you can see that there is a small gap between the chain 3 and the next crocheted stitch.

Later on I learned that some crocheters made the same chain 3 to begin a new row, but did NOT count the chain as a separate stitch -- it was merely a bit extra at the edge.  This took care of the unsightly gaps, but that extra bit gave the edges a wavy, or scalloped, look as you can see in the middle photo.  That's not always a bad look, but for those times when you'd prefer a straighter edge I've found a method that works fairly well -- it won't be razor straight -- but it will be a neater edge.

Photo 3 illustrates this newer method. I've seen it referred to as a "stacked" method and since that makes sense to me that's what I'll call it.  There may be other names though! I don't know who came up with this first, so I can't give credit, but I can give thanks to whoever it was -- it's fairly simple, and it really helps straighten things out!  (Click photos for larger image)


For the stacked method, you do not chain anything at the end (or beginning) of your dc row. You simply turn the work, and in the very first stitch make a sc (US terminology) in that stitch in the usual way.  See photo a) for where to begin, see photo b) for first sc made.

Now in the sc that you just made you will insert your hook into the LEFT (as facing you - photo c)) leg of that sc and work another sc.  So, hook into left leg, yarn over hook, pull through --2 loops now on hook -- yarn over hook again and pull through both loops on hook. This gives you the effect of two sc stitches, one sitting atop the other.


Photo d) shows the completed "stack". From here you continue the row as usual. You will have noticed that this method was illustrated on a piece that had already been started.  But how do you do this if you want to start from the very beginning chain? The answer -- I don't know, I've never done it that way.  I had read a hint somewhere to make the very first row of your project in sc and that seemed much more sensible (to me) than trying to wrangle this stacked dc into a beginning chain. You may feel differently, so experiment -- nothing to lose but a bit of time!

Tuesday, November 19, 2019

A little tabbed scarf, part II

Back in the dark ages, I posted a pattern for a vintage scarf that I converted from knit to crochet.  It was very simple, primitive even, and I always meant to rework it into something with a little more sass. Twelve years later -- a found ball of hand-painted yarn said to me "I'd like to be a little tabbed scarf but this time with a little personality. Oh, and maybe lose the tab."

This isn't a pattern for the new version, since I used a motif from a Japanese pattern book that I cannot reproduce here.  It is simply a recipe for what I did.  There are tons of patterns for crochet motifs in books or on the web, so substituting your own favorite should be no problem.  I especially like to work from Japanese patterns because they are "written" in symbols -- and for this crocheter that's so much easier  to understand what stitch is used, and where it's placed.

It's worked in three pieces -- two motifs and the connecting neck band.  Could you do it in less? Maybe, but I didn't try. The motifs are only connected to the neck band with a few stitches -- easily done -- especially if you leave a decent length of yarn at the start/finish. So, create two motifs of your choice -- something with points is ideal, because it will create its own slit for wearing when connected to the neck band.  The neck band I made measures 19 3/4" (abt 50 cm) in length and is 3 1/2" (abt 9 cm) high.  For reference, my neck (measured loosely) is 14 1/2" (abt 37 cm), so roughly 5 extra inches (or 12.7 cm) in length above your neck measurement for the length of the band.  I worked it in a pattern of 1 row hdc/1 row dc (US crochet terms).With the yarn/hook I was using that worked out to be a band width of 15 stitches -- your mileage may vary. My kitchen scale tells me I used about 70 gr (abt 2 1/2 oz.) of yarn for this.  I kept the edges nice and straight by using "stacked" sc stitches to begin each row instead of chain stitches. Next post will give a little demo.

Block all your pieces, notice that your motifs are two different sizes, slap your head then say "well, that will add an extra dimension of style" and then sew them to the ends of the band with a few overcast stitches at each end of the neck band -- leaving an opening to pull (either) scarf end through to wear. Easy!


A little pop of color to brighten up a winter sweater, or even to fill in the neckline of your coat.

I used a pattern from this book which is pretty much only written in Japanese, except for "Crochet Patterns Book 300 Motifs Edgings" written on the cover. My star motif was #124.


Monday, November 11, 2019

Getting my beret on

Getting a bit chilly these days, so time to think about sewing up some new head coverings. I turn to an old favorite -- Vogue 9082 by designer Patricia Underwood. Now out of print, but well worth searching out if you like sewing hats. This one pattern has you covered stylishly, with 5 different hats plus an ascot.  I chose to make a beret.

Since I had some cuts of silk necktie fabric I decided to use that for the top and also as a bias band around the lower brim. The crown of the hat is wool melton, and the lining is a scrap of rayon bemberg. To give the silk a bit more body, I quilted it in a simple diamond pattern to some thin batting I had on hand.  

A hat like this is quick and easy to sew -- if, of course, the pattern you're using is well drafted like this one -- 


Monday, November 4, 2019

Hidden Treasure

It may be a sign you knit too much when you go looking for some yarn in a cedar chest and find an almost complete wrap/scarf that you had completely forgotten. Or, perhaps a sign of age-related forgetfulness — but let’s go with “knits too much”, yes?

A search through Ravelry revealed it is Boxleaf Wrap by Ann Hanson.  I ‘think’ it is Blue Sky Fibers Baby Alpaca sport, as I can at least remember buying some, and it certainly has the feel of deliciously soft baby alpaca.

All that remains of finishing is to run in a few ends — and just like that a FO. Black magic! 


Friday, October 25, 2019

Almost harvest time


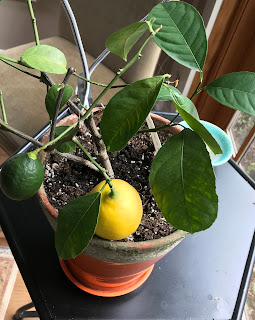
This scrawny little Meyer lemon tree just keeps on producing luscious little lemons! Sadly, usually just one at a time — biggest harvest so far has been two — but you’ve got to admire its determination under some tough conditions — low light, low humidity, haphazard watering — there just might be a life lesson there. 

Sunday, October 20, 2019

Swatch out!

Ran across a few swatches made with a SilverReed 280 punch card knitting machine while doing a little tidy up in the sewing room.  These are not swatches for taking a gauge measurement for garment making, but rather just swatches to check out various pattern cards used in the pattern reader.  Most of them are for patterns that I manually punched myself, so doubly important to make sure that I did them correctly!


And these next two are from cards that came with the machine, or with the lace carriage (which is purchased separately). Not worried about these being punched incorrectly, but I like to see how the pattern looks in actual wool.


Most of the self-punched cards were done from old manuals downloaded from the Pattern Library  at Knitting Machines etc. There are card templates at other sites too, most noticeably a Russian machine knitting site, but I haven't tried them -- just a bit leery of Russian sites these days. There are also a few internet vendors with pattern cards, but availability is somewhat sketchy as these are mostly old stock -- as always, Mr. Google is your friend.

Now, maybe I need to actually put one of them to use in a garment, hmmm?


Wednesday, October 9, 2019

Crankin' it up

Here at MinglingYarn we have a major love for cozy wool socks. So, when physical issues interfered with handknitting production I turned to a CSM (circular sockknitting machine) from Erlbachergearhart to keep up production.

 I got the Speedster and a couple of different sized cylinders -- but decided to forgo the ribber unit until I knew whether or not this machine and I were a good fit.  Although there is a definite learning curve, it wasn't too long until I was cranking out warm, toasty socks.  Surprisingly, we didn't find the lack of ribbing to be a deal breaker, so I decided to keep on without the added investment (and additional learning curve) of the ribber.  If I were interested in selling socks I would reconsider, since most folks tend to like that look, but since I'm not -- well, no brainer, more money for yarn!

I also added a small cone winder to make knitting easier.  Early days saw me using a regular 'cake' winder, but the yarn feeds off much easier when wound on a cone.  The Royal cone winder works well, but they seem to be a bit harder to find here in the US, so I ordered one from Germany. Their website has an English translation, but for those interested you're looking for a Kleiner Konenwickler (small cone winder). Absolutely no issues with ordering, and delivery was prompt.


Currently being knit are some plain grey socks from Valley Yarns Huntington which is a house brand from Webs. This yarn seems a bit lighter in weight than my usual, but after washing they fluffed up enough to make an acceptable fabric.

Hemmed top, and a wide mock ribbing down the leg only.

Also being finished are some socks from Brown Sheep's sock yarn (and I'm blanking on it's name, because it's from DEEP stash).  These are hemmed top and totally plain knit.  The neon green yarn in the photo is waste yarn used to take the socks off the machine.  That sock is still waiting for me to graft the toe closed.


Tuesday, October 1, 2019

A change of bling

As summer fades into autumn it seems time to change up the sassy, colorful earring bling to something a little more sedate.


So goodbye turquoise hoops -- pattern from Off The Beaded Path 

and hello to a softer blue and silver square.

It's a simple, easy to make design done in square stitch 
using Miyuki cube beads in a checkerboard pattern. For these, after the stitching was done,  I pushed a decorative head pin through the middle of the square and then formed a loop for the earring wire to go through.  It's also possible to use the tail end of your beading thread to securely stitch a closed ring to the top middle of the square if you prefer.


And although these beaded earrings don't need the added protection, I also made up a couple of small bags for silver earrings made from a tarnish resistant silver cloth from Amazon. I'll be happy if it extends the time between polishes for even a little bit.


Wednesday, September 25, 2019

Diving deep...

...into the yarn stash for a couple of small skeins of hand-spun yarn.

At one point it seemed like a good idea for a knitter/crocheter to learn how to spin.  Lessons were taken, a wheel was bought, and I fell in with a rogue gang of local spinners.  Camaraderie was enjoyed, and bits of fluff were turned into usable yarn.  I never became entirely proficient though, probably due to a lack of practice, practice, practice. Years pass, wheel gathers dust, and small skeins of hand-spun languish.  Until -- 


A hat appears!  A rather rustic hat, but a useful garment nonetheless.

The brown yarn is from a breed known as Manx Loughtan.  It's a British rare breed known for their interesting horns (among other things I'm sure).  Behold --

The lighter beige yarn is from the California Red breed.  No, the yarn isn't red -- it's the faces of the sheep themselves that are -- see?


Well, perhaps more russet than red, but then no one consulted me. 

So, at long last, something useful -- and who knows? -- maybe the spinning bug will bite again!

Friday, September 20, 2019

Eco Crafting

In an effort to cut back on waste produced in this household, there have been some projects made to replace throw-away or short term use items.  Here are a few --

Cloth napkins -- super easy to make, and pleasant to use.  I like to use quality cotton quilting fabric -- sometimes bought specially, but often leftovers from other projects.  Who says your napkins all have to match?  For meals I like a napkin around 18" square (finished size) -- 10" squares would give you a good size for cocktail napkins to hand out with drinks and nibbles.

In the kitchen I have gone through too many plastic covered sponge scrubbies to count. I'm currently trying out some homemade scrubbies made with Red Heart Scrubby Sparkle yarn. It's polyester, so not ideal, but seems to stay fresher than my former scrubby and so far is holding up well. For knitters, there's a nice pattern on  Ravelry  If crochet is your thing -- Midwesternmoms.com has you covered.


How about replacing plastic wrap with some waxed wraps?  There are many instructional sites online -- I went with a link I found on www.apartmenttherapy.com


And finally, a hanging hand towel for cutting back on paper towel use, or wiping hands on the nearest dishtowel.  No link or pattern for this one, as it's just a prototype I made up myself one evening. Will need some tweaks before it shows up as a mini tutorial.  This one is made from some scrap heavy weight cotton, and I finally got around to trying out Kam snaps  -- very easy to use, we'll see how they hold up.


Saturday, September 14, 2019

“Once more unto the breach...”

There’s something worthwhile about keeping a record of creative pursuits, no matter whether anyone else sets eyes on this journal — and so I begin again.