Monday, July 30, 2007

A little change of pace --

For those times when I don't feel like slogging away on the Sandy cardigan (oddly enough, occurring more and more frequently), I'm trying out an idea for a toddler boy's sweater.

I went with a drop-shoulder style - for ease in shaping - and a placket yoke, for ease in dressing said toddler boy. Sleeves and lower body are done in a simple hdc through the back loop on every row, and the yoke is sc, chain 1. Both very simple stitches, but I think they combine nicely.

It's working up fairly quickly in a sport weight washable wool blend. In fact, it's going so quickly that I'll need another 'Sandy procrastination" project soon. Maybe one of the shawl patterns that I just ordered from Heirloom Knitting (Sharon Miller), hmmmm?

Sunday, July 29, 2007

Resistance is Futile...

I believe I may have planted a wee bit too much squash for the two of us. The age-old dilemma -- do you plant just one hill of squash and hope it prospers? Or do you hedge your bets and plant two? Despite valiant efforts (steamed, sauteed, pickled, in a casserole, roasted, and so on, and so on) I fear I grow weaker...

For some reason, an abundance of tomatoes never seems to be as much of a problem. Here's one tasty way we like to eat them. A word of caution though -- the success of this recipe depends on the quality of the tomatoes. Don't even think about making it unless you've tasted them and know they are superb.

No Cook Tomato Sauce for Pasta
  • vine-ripened tomatoes, about 5 or 6 medium to large
  • 1/3 cup olive oil
  • 1/4 cup sweet onion, finely diced (Vidalia is nice, if available)
  • 1 clove garlic, finely minced
  • 2 Tablespoons balsamic vinegar
  • 1 teaspoon dried oregano, or Italian seasoning
  • salt and freshly ground pepper, to taste
  • fresh mozzarella, cubed - quantity to your taste, we use about 1 cup
  • 2 Tablespoons pignoli (pine nuts) - optional, but nice
  • fresh basil, for garnish, cut into thin strips

At least one hour before serving, combine all but the last three ingredients in a bowl, mix, and let stand so flavors can blend. Just before you combine the sauce with your pasta, add the mozzarella and pignoli to the sauce. Top your drained hot pasta with the sauce, and toss. Garnish with the basil strips. Serve and enjoy. Note: I like using a shaped pasta for this (all the better to scoop up little mouthfuls of sauce with every bite) -- the spouse prefers linguine; cook's choice, but have some crusty bread on hand to sop up the juicy goodness if you go with flat pasta.

Thursday, July 26, 2007

Okay, made it through that...

...with only minor brain damage from hitting my head against a wall too many times to mention. It's taken me a while, but I'm finally realizing why my Google searches aren't turning up a lot of completed Sandys.

Anyway, I do believe I've managed to (successfully) complete a shaped side panel and start on my way to sleeve completion. For those playing along at home, here's a few things I've learned.

There are eleven math calculations needed to be done before starting this section, and - surprise! - all known pattern errata are in this section. So, check pattern errata carefully, then double check to make sure you didn't miss one. (rip out #1)

Next, make sure your slipped stitches are done with your yarn in proper position (i.e. to the wrong side). This comes naturally with the first slipped stitch, but you need to remember to bring your working yarn to the back before slipping that second one. (rip out #2)

Now, rip out #3 has more to do with my shape than with the pattern. It's a curious thing though - you do all these calculations to customize the width of the sweater, but (as far as I can tell) there is no mention of adjusting where you are placing the waist. Again, as far as I can tell, everyone has the narrowest part of the garment falling at row 72. Can you tell that this just might be one of my fitting issues? If I'm going to the trouble of doing all this math, then I want to make sure that my narrowest part hits at the same place as the garment's narrowest part. So, rip it good!

At this point in the program I would normally be wadding the sweater up and throwing it in the back of the closet. Instead, I read the final Harry Potter and was cheered by someone in a bigger mess than I was.

I was glad that I initially decided to keep the sweater in 2 separate pieces through the side panel shaping. I have yet to see a problem with seaming the back after this is done, and it was nice not to have quite as much fabric flopping about as I knit, and re-knit. Your mileage may vary, though.

So, plodding along with the sleeve now, and wondering what new challenges await!

(A closer view of the side panel)

Friday, July 20, 2007

Owwww, this is making my brain hurt!

I had hopes of showing a photo of at least one shaped side panel complete on the Sandy cardigan I'm currently working on. Alas, as I rip that sucker out for the third time, that is not to be. I may need to distract you with more photos of produce -- lots and lots of tomatoes, not to mention the squash. Anyone have any nifty ways of preparing crookneck squash that they'd like to share? At any rate, I will persevere, and there will be a photo soon, just not right now. Right now I'm taking a break and heading out to the movies.

Tuesday, July 17, 2007

Summer's bounty...

Finally the hard work of spring pays off as we start to harvest some veggies from the garden. Last year we only planted tomatoes and melons, and sadly most of the tomato harvest reached peak while we were away, so we came home to find them literally broiled on the vines. This year the spouse has been practically babysitting them, fussing over their needs like an indulgent papa. It seems to be paying off -- looks like there will be a bumper crop.

For those who like fresh salsa (salsa cruda?) here's the hardworking farmer's favorite recipe:
Fresh Salsa
  • tomatoes, 4 medium, chopped
  • 1/2 red onion, finely chopped
  • 2 or 3 fresh jalapeno peppers, finely chopped
  • 1/4 cup cilantro, chopped
  • 1 - 2 Tablespoons fresh lime juice
  • 1 or 2 cloves garlic, finely minced
  • 1 teaspoon brown sugar
We tend to like a "juicier" salsa, so we chop the tomatoes without removing the seeds - feel free to seed them if you prefer. If you're a little wimpy when it comes to pepper heat you'll want to seed the peppers too. As always, be careful when working with hot peppers - that juice can burn! Mix all ingredients together and let sit for at least 1/2 hour so the flavors can merge. Break open a bag of corn chips and enjoy!

Sunday, July 15, 2007

A quick little project...

...or so I thought.

I unearthed a kit for a simple crocheted hat while going through a closet, and decided it would make a dandy little "when-I-don't-feel-like-working-on-something-big" project.

It's from Kim Hargreaves and made with Rowan Kidsilk Haze and Kid Classic - two yarns that I haven't used before. For those unfamiliar, Kim was a top designer for Rowan who now sells her designs through her own web site. Everything is sold in kits, which are absolutely lovely - patterns printed on heavy card stock, Rowan yarns nestled in tissue paper, all 'extras' (ribbons, buttons, beads) included, even a little designer label all packaged in a crisp white box. Very pretty, and rather pricey.

At any rate, this little tam seemed perfect for an evening's entertainment. The pattern is worked with both yarns held together, the body is all dc(double crochet)(treble crochet if you're British) with the last 5 rows done in sc with a bead on every stitch. Nothing scary there, right? And in fact, it went quickly enough until I hit those last 5 rows.

Per instructions, you break the Kidsilk Haze, string the beads on that tiny, hairy little yarn, then rejoin and work one bead into each stitch. Now, I hate having to work in ends, so I thought I'd use an alternate method - placing a bead on the stitch as needed, instead of stringing them on all at once. I've used the technique with knitting, and liked it. No wear and tear on the yarn from constantly sliding beads along and no fidgeting with easing the bead into proper alignment. What I failed to remember though, was that this project called for placing a bead in EVERY stitch - all 270 of them.

At bead 5 I realized I didn't want to do that for 5 rounds. So, back to the instructions, we'll do it Kim's way. Broke the yarn, threaded the beads, and started to stitch. One laborious stitch at a time - hook through stitch, both yarns over the hook, scoot the little bead into proper alignment (I wish!) and complete stitch. See that the bead has migrated to back side of work - re-do. Repeat, stitch by painful stitch, for hours. Finally it was done, only the non-beaded edging row to do. So I tried it on. Wait for it...

And it was too tight. I could have cried. I had tried it on prior to the beading rows and it had fit perfectly (it still had the same number of stitches) - now it didn't. All that struggle and I couldn't even wear it. No tears though, I handled it like the mature person I've become, and, cursing like a sailor, ripped it out stitch by hairy stitch.

One stiff drink later and I was ready to re-do. Taking a larger hook and hoping for the best I set to it. And noticed something odd. I was still stitching slower than normal, but I was moving at a steady pace. Was it a miracle? Was I too buzzed to care? Nope, it was simply that after ripping the beads were now spaced out on the yarn instead of all clumped together. With minor adjustments they were now where they needed to be, without constant movement by me. And so it was finished. And it even fit. And a little dose of irony? You can hardly see the beads.

Finished hat modeled by Sven.

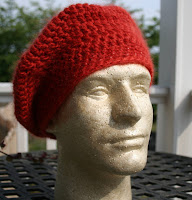
Yes, Sven is a guy and it's a ladies hat. Not to worry - he's very secure in his Styrofoam masculinity and doesn't mind. He got the gig because, unlike Miss WigFormHead, his cranial dimensions more closely match human proportions.

See guys, size does matter!

Wednesday, July 11, 2007

Arf!

Well, that would be a quote from another Sandy, but meanwhile, here's the one I'm working on --

It's from Big Girl Knits, and I'm using the called for Noro Kureyon, plus an oldie from the stash, Poet by Classic Elite. I've had that yarn for quite a while, in fact, it's auditioned for two other starring roles, but sadly didn't make it to the big time in either. Just goes to show that working to the same gauge is NOT the only consideration when making yarn substitutions. So far, it seems to be working out just fine for this application.

I decided to not seam the back before adding each side piece -- I think that shouldn't be a problem, but time will tell. I'm making no effort to "match" the Noro pieces, since I like a little dissimilarity -- must be all those fraternal self-patterning-yarn socks I've knit.

Friday, July 6, 2007

Combo mambo...

Inspired by Annette Petavy's knit/crochet pattern Josephine, I've created a sleeveless tank combining a knitted upper portion, and an airy, open crocheted border. Continuing the knit/crochet theme, the neckline is edged with single crochet and picots, and the armholes feature a purled edging (pick up stitches around opening, purl one row, bind off in purl).

The pattern for the knit portion was generated by Sweater Wizard. The crocheted border is a favorite stitch pattern from a Japanese crochet stitch dictionary. I changed the knit/crochet ratio of the inspiration design as I didn't want as much skin on view. Using the Golden Ratio gave me a border that provides more coverage, but is still pleasingly deep.

Yarn used is Knit Pick's Shine Sport in color Cloud. I used 7 skeins for a size medium. Shine Sport is a pima cotton/modal blend available in 20 colors for $2.49 (US) for a 110 yard, 50 g. skein. It's machine washable/dry able. I noticed a slight amount of fuzzing on two small areas (stitches, really) after machine washing the top. There is some shrinkage, so a washed/dried swatch of large size is a necessity. True to its name, the yarn has a slight gleam (at least in this silvery gray color) and is quite soft. I'll definitely use it again, but will be keeping an eye on how it holds up to repeated laundering.

I was pleased with my effort, but would recommend you take a look at the original I drew inspiration from. Annette is a very talented designer who is starting to receive much-deserved notice, especially in crochet circles. Her zippered cardigan design "Weekend Jacket" in Interweave Crochet Spring 2007 is one that I'll be trying later. She has a blog -- Mots et Mailles -- for those who can read French (which I do rather poorly), but even if I'm not getting every word, I enjoy seeing what she's up to.

Wednesday, July 4, 2007

A little sewing, a little crochet...

I have previously mentioned wanting to do a variation on the Galaxy Top by Katy Westcott. Not quite done yet, but here's what I have so far.

Instead of working with a purchased tee-shirt, I used some cotton interlock I had on hand and a simple sleeveless tee-shirt pattern to sew the body. The bodice yoke is some leftover cotton/microfiber yarn that I used for a lacy bolero. I had originally thought to use motifs from the latest Japanese crochet pattern book I got, but the yarn didn't really lend itself to that (too soft). So I went with an allover stitch pattern -

I decided to make the yoke as a separate piece and just sew it to the edge of the front and back pieces instead of picking up stitches from the fabric. It seemed to work fine, but I have a feeling that Katy's method is a bit easier.

I haven't hemmed it yet, as I'm still trying to decide if I want to have a plain hem, or add a crochet border. We'll see.

Despite the fact that I procrastinated quite a bit with the sewing, it's a quick little technique that gives fairly good results, I think.