...or so I thought.
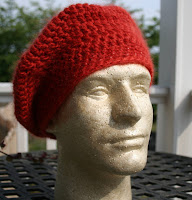
I unearthed a kit for a simple crocheted hat while going through a closet, and decided it would make a dandy little "when-I-don't-feel-like-working-on-something-big" project. It's from Kim Hargreaves and made with Rowan Kidsilk Haze and Kid Classic - two yarns that I haven't used before. For those unfamiliar, Kim was a top designer for Rowan who now sells her designs through her own web site. Everything is sold in kits, which are absolutely lovely - patterns printed on heavy card stock, Rowan yarns nestled in tissue paper, all 'extras' (ribbons, buttons, beads) included, even a little designer label all packaged in a crisp white box. Very pretty, and rather pricey. At any rate, this little tam seemed perfect for an evening's entertainment. The pattern is worked with both yarns held together, the body is all dc(double crochet)(treble crochet if you're British) with the last 5 rows done in sc with a bead on every stitch. Nothing scary there, right? And in fact, it went quickly enough until I hit those last 5 rows. Per instructions, you break the Kidsilk Haze, string the beads on that tiny, hairy little yarn, then rejoin and work one bead into each stitch. Now, I hate having to work in ends, so I thought I'd use an alternate method - placing a bead on the stitch as needed, instead of stringing them on all at once. I've used the technique with knitting, and liked it. No wear and tear on the yarn from constantly sliding beads along and no fidgeting with easing the bead into proper alignment. What I failed to remember though, was that this project called for placing a bead in EVERY stitch - all 270 of them. At bead 5 I realized I didn't want to do that for 5 rounds. So, back to the instructions, we'll do it Kim's way. Broke the yarn, threaded the beads, and started to stitch. One laborious stitch at a time - hook through stitch, both yarns over the hook, scoot the little bead into proper alignment (I wish!) and complete stitch. See that the bead has migrated to back side of work - re-do. Repeat, stitch by painful stitch, for hours. Finally it was done, only the non-beaded edging row to do. So I tried it on. Wait for it... And it was too tight. I could have cried. I had tried it on prior to the beading rows and it had fit perfectly (it still had the same number of stitches) - now it didn't. All that struggle and I couldn't even wear it. No tears though, I handled it like the mature person I've become, and, cursing like a sailor, ripped it out stitch by hairy stitch. One stiff drink later and I was ready to re-do. Taking a larger hook and hoping for the best I set to it. And noticed something odd. I was still stitching slower than normal, but I was moving at a steady pace. Was it a miracle? Was I too buzzed to care? Nope, it was simply that after ripping the beads were now spaced out on the yarn instead of all clumped together. With minor adjustments they were now where they needed to be, without constant movement by me. And so it was finished. And it even fit. And a little dose of irony? You can hardly see the beads. Finished hat modeled by Sven. Yes, Sven is a guy and it's a ladies hat. Not to worry - he's very secure in his Styrofoam masculinity and doesn't mind. He got the gig because, unlike Miss WigFormHead, his cranial dimensions more closely match human proportions.
See guys, size does matter!
1 comment:
Enjoyed reading your story! Glad it worked out in the end.
Post a Comment